DFM (Data Folder
Manager) Help Doc
Author:
Jeff Platt
Date Last
Modified: 09/15/2025
(added DFM and DFM Card Loader Videos)
General Overview
The DFM
(Data Folder Manager) is an interface that allows the player to point JCapper at
target folders anywhere on a machine. The interface allows the player to
persist up to 3 predefined folders (although more than 3 can be used for data
storage.) Folders persisted in the DFM
are recognized by all of the JCapper modules.
The DFM
(Data Folder Manager) also contains a Card Loader. The DFM Card Loader provides
a drag and drop enabled interface for loading past performance data files into
JCapper on up to 3 folders simultaneously.
DFM Videos
Maximize the Player to Watch & hit the Escape key to shrink afterwards
Video #1 – Creating Folder Structure for the coming New Year in the DFM:
Video
#2 – Setting the Current Active Data Folder, DataFolder2, and DataFolder3 in
the DFM:
Applies to all versions of JCapper with a DFM dating back to
2011.
Video
#3 – Switching Back and Forth Between Calendar Folders
in the DFM and HDW File Mgr:
In the above video I use the +All button to highlight
every chart file available for download on the HDW server.
That works when all of the chart files belong on the
Current Active Data Folder displayed on the Download button.
The video was recorded on 12-31-2024 and all of the available chart files were
from Q4 2024.
So the +ALL button works for that date (12-31-2024)
But you can't use the +ALL button when the rolling 45
days of files on the HDW server span two calendar quarters.
Video #4 recorded on 01-02-2025 - Corrected Charts When the Available Files on
the HDW Server Span Two or more Calendar Quarters:
Launching the DFM (Data Folder
Manager)
Individual
DFM launch buttons are found all throughout JCapper wherever and whenever selecting
drive and/or folder might be appropriate. To launch the DFM, simply click one
of the launch buttons. Hint: They are all labeled DFM.
Screenshot
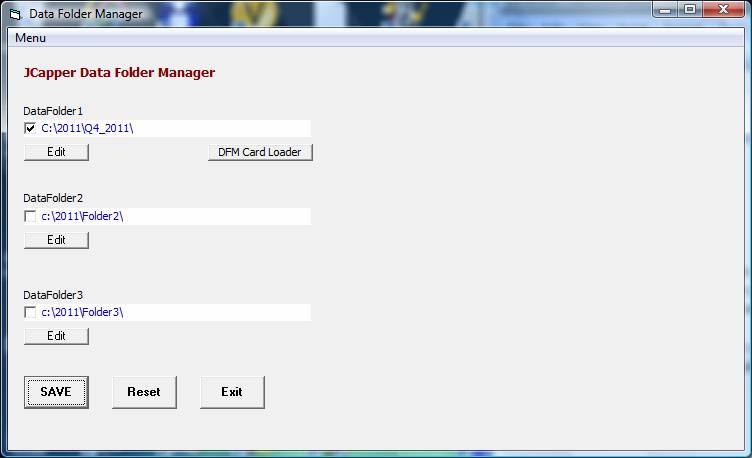
The above
screenshot shows the DFM (Data Folder Manager) interface. Note that the
interface displays the folder name for each of the 3 user persisted folders.
Also note that folder 1 is persisted as checked – making folder 1 the current
active data folder.
Edit Folder Buttons
There are
Edit buttons located immediately beneath the visual display for each of the 3 user
defined folders. Clicking this button brings up a set of Folder Nav tools.
To bring up
the Folder Nav Tools for a specific folder (for
example folder 1) click the Edit button for that folder.
Folder Nav
Tools
The Folder Nav Tools used in the DFM can be found throughout JCapper
wherever and whenever selecting a drive and/or folder is called for.
Drive can
be selected using a simple mouse click.
Folder can
be selected using a double click.
After drive
and/or folder have been selected, and the Nav Tools
are no longer needed, the Nav Tools can be hidden by
clicking anywhere on the module where you launched the Nav
Tools from (in this case the DFM) outside of the Nav
Tool border. Note that this same behavior for hiding the Nav
Tools once they are no longer needed is the same all throughout JCapper.
Folder Checkboxes
There are
Folder Checkboxes located immediately beneath the visual display for each of
the 3 user defined folders. Each checkbox has a label that displays the folder
name.
Checking a
box (followed by clicking the Save button) persists that folder as the current
active data folder.
Current Active Data Folder
When a
folder is persisted as the current active data folder in the DFM, all JCapper
modules recognize and auto point to that folder when they are first launched.
Example:
The user persists c:\2011 as the current active data
folder in the DFM (and then exits the DFM.) The user then launches another
JCapper module such as the HDW File Manager or the Past Performance Generator.
When first launched, the new module will auto point at the c:\2011 folder as
both the target folder where it writes to and as the source folder for reading
data that it needs.
For The HDW
File Manager, files downloaded from HDW are saved to and .JCP and .XRD files
built during a file build routine are written to the current active data folder
as persisted in the DFM (in this case c:\2011.)
For the
JCapper Past Performance Generator, the default folder for loading past
performance data files and for generating html past performance reports will be
the current active data folder as persisted in the DFM (in this case c:\2011.)
Inactive Data Folders
Only one
folder, the current active data folder, can be active at any one time. However,
the DFM provides an interface for persisting up to 3 folders concurrently. That
means that the other two, although persisted for easy access, are inactive
until called upon by the user.
Persisting Folders
To persist a folder in the DFM:
- Click the Edit Folder button to
bring up the Folder Nav Tools.
- In the Folder Nav Tools, select drive with a mouse click, Select folder with a double click.
- With the desired drive and/or
folder selected, hide the Nav Tools by clicking
anywhere on the face of the DFM outside of the Nav
Tools border.
- Check the box for that folder
if you wish to persist that folder your current active data folder. Leave
the box for that folder unchecked if you wish to persist
that folder as inactive.
- Click the Save button.
Changing the Current Active Data
Folder
To change
the current active data folder: check the box for the folder you want to
persist as your new current active data folder and click the Save button.
Save Button
Clicking this
button persists folder names and status (checked for active or unchecked for
inactive) as they are currently displayed on the interface.
Note that
persisted data is written to the SystemInstall table
in the c:\2004\JCapper.mdb file (where other JCapper modules can retrieve that
info as needed.)
Reset Button
When first
launched, the DFM will store the current folder display in memory. At any time
(before exiting the DFM) while navigating the drive and/or folder structure on
your machine you wish to make the DFM reset back to the original folder display
stored in memory, click this button.
Exit Button
Click this
button to exit the DFM.
DFM Card Loader Launch Button
Clicking
this button launches the DFM Card Loader.
THE DFM CARD LOADER
DFM Card Loader Videos
Maximize the Player to Watch & hit the Escape key to shrink afterwards
Video #1 – Download Today's .JCP Files and Yesterday's Chart Result Files from the HDW site:
Video #2 – Loading .JCP Files - the Easy Way:
Video #3 – Loading .JCP Files - Different Ways and DataFolders by Post Time:
Video #4 – Loading .DAT Files - Odds and Payoffs on your HTML Reports:
DFM Card Loader Overview
The DFM
Card Loader provides a drag and drop based interface for loading past
performance data files into JCapper. Data Files can be loaded on up to 3
folders simultaneously.
Why Multiple Folders?
A JCapper Calc Races routine is designed to handle no more than 12-15
race card files concurrently. The actual upper limit varies from one user to
the next and is determined by the number of active UDMs times the total number
of horses in data files included as part of a Calc
Races routine.
The DFM
(Data Folder Manager) was created as a way for the player to get beyond this
limitation. The DFM Card Loader interface allows the player break up the race
card files for a single race day into multiple folders (without having to
physically copy files from one folder to another.)
After
loading files on multiple folders into JCapper with the DFM Card Loader, the
player can then run separate Calc Races routines for
individual folders. This cuts down on the number of data files per Calc Races routine. Therefore, individual Calc Races routines require less memory and execute faster
than if they included a larger number of data files.
Note that
while Calc Races routines execute on an individual
folder, it is not (repeat not) required that data files themselves be copied
from one folder to another. (In fact, I recommend that you simply leave your
data files on whatever target folder you downloaded them to.)
Note that
if you never plan on loading 12 or more past performance data files into
JCapper at any one time for Calc Races purposes, you
can get by using just one folder (even though the DFM Card Loader interface
allows you to use more if you want to.)
Help Menu
Clicking
the Help Menu brings up a screen where you can read Basic Operating
Instructions. The basic operating instructions are should give 99 percent of
you enough info to be up and running with the DFM Card Loader in a very short
time.
BASIC OPEARTING
INSTRUCTIONS
The
basics as presented in the DFM when you click the Help Menu:
- USE THE DFM (Data Folder Mgr)
to set your active data folders before attempting to load .JCP .DRF or
.MCP data files into the program.
- SELECT DATA FILE TYPE using the
drop down found in the bottom left hand module screen area.
- USE THE FILE FILTER TOOL to
display data files for specific track codes/dates sitting on your current
active data folder.
- CLEAR previous day race card
files and scratches from folders 1, 2, and 3. (Click the Clear ALL -
Folders 123 button.)
- DRAG AND DROP a group of data
files from the list of displayed files (far left hand column) onto target
folders 1, 2, and 3.
- SELECT AND LOAD data files
appearing on the interface for folders 1, 2, and 3. (Click the Select ALL
and Load - Folders 123 button.)
Those are
the basics.
Suggestion:
Before going any further, spend some working hands on with the program.
Practice finding, clearing data files from, and loading data files into JCapper
using the basics of the DFM Card Loader as presented above.
After you
get the hang of things – and can find past performance data files, clear
currently loaded data files from the program, and load new data files into the
program (onto individual target folders and at will) – you will have
accomplished the main goal.
(That’s
another way of saying that 95 percent of what you need to know about loading
past performance data files into JCapper using the DFM Card Loader is presented
above.)
Further
detail about this module, is presented below.
Screenshot
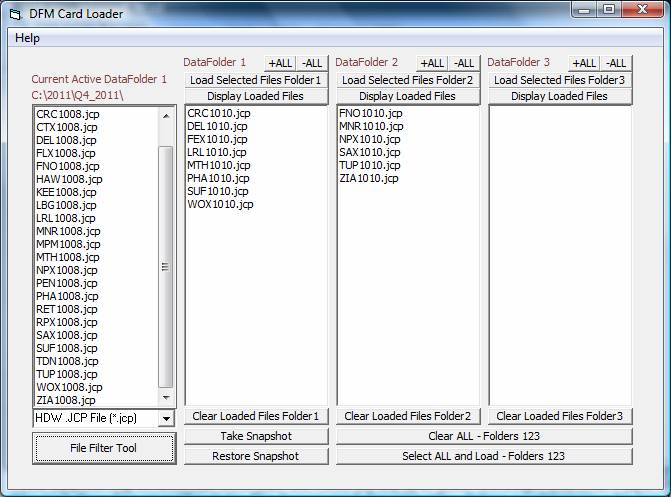
The above screenshot
shows the DFM Card Loader. Note that the File List Box has been filtered to
display .JCP files for 10/08/2011 and that file names (based on post time for
R1) have been dragged and dropped onto folders 1 and 2.
Current Active Data Folder
When first
launched, the DFM Card Loader auto points to the current active data folder as
persisted in the DFM.
File List Box
The File
List Box displays a list of data files (of the file type selected in the File
Type Drop Down and/or filtered by date and track code after clicking the Apply
button in the File Filter Tool) for the Current Active Data Folder.
Note that
the name File List Box refers to the
column of file names on the left hand side of the DFM Card Loader visual
interface (beneath the brown label that reads Current Active Data Folder.)
Files
appearing in this list box can be filtered by the user through the File Type
Drop Down and by applying a Date in the File Filter Tool. Filtering the File List
Box for specific data file types and for specific dates (track codes too)
enables you to find and load specific data files into JCapper.
File Type Drop Down
Use this
drop down to select the data file type you intend to be working with. Note that
the file type selected in this drop down must match the Data Vendor Setting as
persisted in the User System Definitions Screen.
Selecting a
file type from the drop down will filter the File List Box for the file type
selected.
File Filter Tool
Clicking the
File Filter Tool button launches the File Filter Tool.
The purpose
of the File Filter Tool is to enable the user to define specific parameters for
track code, date and file type – and then click an Apply button to populate the
File List box with data files on the current active data folder matching the
specific parameters supplied.
Note that
the file type specified in the File Filter Tool must match the file type
specified in the File Type Drop Down.
Populating the File List Box
To populate
the File List Box with data file names on the current active data folder for a
specific file type and for a specific date:
- Select a file type from the
File Type Drop Down.
- Click the File Filter Tool
Button.
- In the File Filter Tool: Select
a file type. Then select month and day of month from the drop downs and
click the Apply button.
The File
Filter Tool will close and the File List Box will populate with a list of data
files matching the user defined criteria.
Clearing Previously Loaded Data Files
Clear Files
buttons are provided for clearing previously loaded data files (and scratches)
from the program.
Best Practice (Workflow)
Get in the
habit of clearing previously loaded data files from the program at the start of
each new race day before loading new
data files into the program.
Clear ALL Folders 123 Button
Clicking
this button clears data files loaded into the program on folders 1, 2, and 3.
The clear files routine initiated also clears scratches on folders 1, 2, and 3.
Clear Loaded Files (Individual
Folder Buttons)
A Clear
Files button for each of the individual folders is presented beneath the visual
display for each folder.
Clicking
this button clears data files loaded into the program on that individual folder
only. The clear routine initiated also clears scratches on that folder.
Loading Data Files into JCapper
The purpose
of loading data files into JCapper is to enable JCapper to run Calc Races routines and/or generate past performances using
the loaded data files.
The primary
mechanism for loading data files into JCapper using the DFM Card Loader is to:
1. Clear previously loaded data files using one of the clear files buttons. 2.
Populate the File List Box with names of data files for a specific race date. 3.
Drag and drop data files to be loaded onto the visual display for a target
folder. 4. Highlight individual data file names on the visual display for a
target folder. 5. Load highlighted data file names into the program by clicking
the Load Files button for that folder. (Or optionally, auto
highlight and load all data file names displayed on the visual display
for all 3 target folders by clicking the Select ALL and Load Folders 123
button.)
Note that
it is not (repeat not) necessary or even desirable to load data files into
JCapper when building databases. (See the Building JCapper Databases Help Doc
and/or the JCapper Message Board for further information about building JCapper
databases.)
Dragging and Dropping Files to a
Target Folder
The File
List Box and Visual Display elements for Folders 1, 2, and 3 are drag and drop
enabled.
Loading a Single Data File into
JCapper
To load a
single data file on a single folder:
- Use your mouse to drag and drop
a single data file name from the File List Box onto the visual display for
a target folder.
- Highlight the data file name on
the visual display for the target folder. This can be done by Clicking or
CTRL-Clicking the file name on the single folder visual display. (Note that
you must use the visual display for the target folder for this. It is not
done on the File List Box itself.)
- With the data file name
highlighted, click the Load Files button above the visual for that target
folder. This will load the highlighted data file into the program.
Optionally, you can double click a single file name displayed on the
visual element of a target folder to load that file into the program.
Loading Multiple Data Files (on
Multiple Folders) into JCapper
To load
multiple data files on multiple folders:
- Use your mouse to drag and drop
a group of data file names from the File List Box onto the visual display
for a target folder. Repeat as needed until names of all data files you
want to load into the program appear on the visual display for each of the
target folders where you want them to be loaded.
- With data file names dropped
onto the folders where you want them, click the Select ALL and Load
Folders 123 button to all load files on each of the 3 folders into the
program.
Note: To
highlight multiple file names on the File List Box so that you can drag and
drop them elsewhere, click the first file name and then CTRL-Click subsequent
file names. CTRL-Click highlighted file names to deselect them.
Also note
that file names can be dragged and dropped from one folder to another.
Also note
that file names dropped onto a folder by mistake can be removed from that
folder by dragging and dropping them back onto the File List Box.
Take Snapshot Button
Clicking
this button takes a snapshot (creates a restore point stored in program memory)
of file names as they are displayed on the visual display for folders 1, 2, and
3.
Restore Snapshot Button
Clicking
this button accesses the latest restore point and puts file names back onto the
visual display for folders 1, 2, and 3 as they existed at the point in time the
most recent snapshot was taken.
The
snapshot and restore snapshot features can be helpful in the middle of July when
you are working with 40 or more data files for an individual race day. Take a
snapshot (create a recovery point) any point in time you have not yet loaded
files but have dragged and dropped a significant number of file names onto
target folders (and would prefer not to have to start over in the event you
make a mistake.)
Note that
the Take Snapshot and Restore Snapshot features do not affect loaded data
files. Snapshots only affect visual display of file names as they appear (visually)
on the user interface.
+ALL Buttons
A +ALL
button is displayed just above the visual display for folders 1, 2, and 3.
Clicking this button highlights all file names displayed on the visual display
for that folder.
-ALL Buttons
A -ALL button is displayed just above the visual display for
folders 1, 2, and 3. Clicking this button deselects all highlighted file names
for that folder.
Display Loaded Files Buttons
A Display
Loaded Files button is displayed just above the visual display for folders 1,
2, and 3. Clicking this button causes the interface to display file names
currently loaded into the program for that folder.